LOGGING INTO YOUR ACCOUNT FOR EDITING
Go to: https://kidefm.org/wp-admin to access the administrator dashboard. Use the username and password you were emailed. If you lost your password, please use the ‘forgot password’ link which you will see on the login screen, rather than emailing Rose first; but if for whatever reason you still cannot login, do feel free to email Rose for further assistance.
Everything that you will need to update your calendar, PSAs, and other website items will be on the lefthand menu of the dashboard, or in the black bar at the top of the dashboard; but I also will share shortcuts to make it easier within these instructions as well. Uploading media, for example, may take a few other steps, as using the FTP client (WinSCP) is more efficient.
TO UPDATE YOUR USER PROFILE
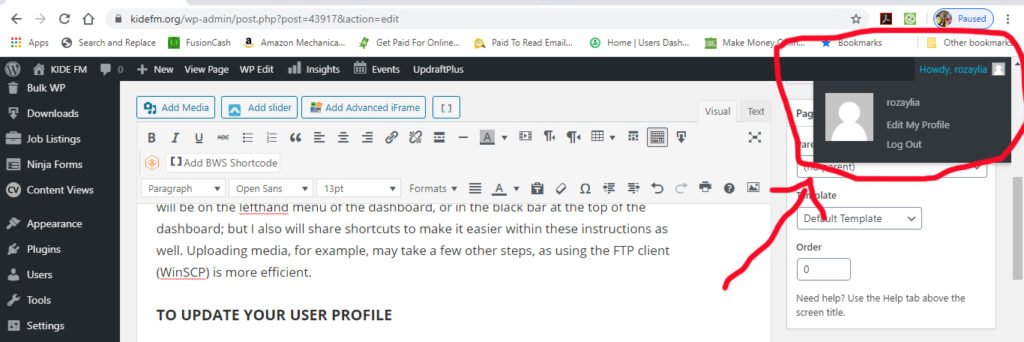
Mouseover your username in the upper righthand corner of the top black bar; click on ‘Edit My Profile’ and fill out the page or make changes to the page that opens there. If you need help with anything on this form, please let Rose know.
HOW TO ADD CALENDAR EVENTS:
MAIN CALENDAR – aka “Community Events”
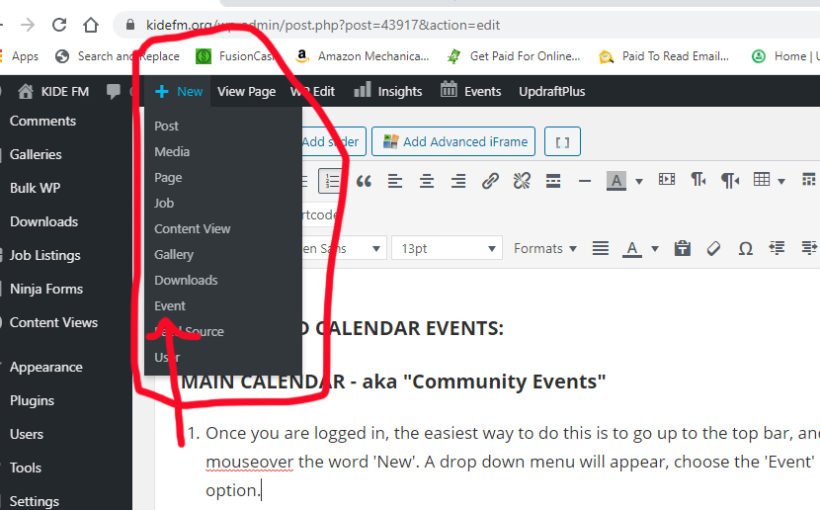
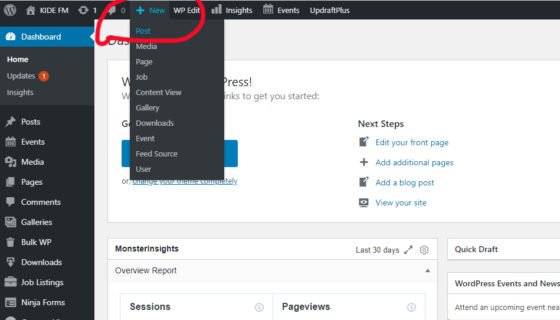
- Once you are logged in, the easiest way to do this is to go up to the top bar, and mouseover the word ‘New’. A drop down menu will appear, choose the ‘Event’ option by clicking on it.
The form that opens up functions similarly to a word processor; with a few important differences to remember that will make your event display exactly how you want it to on the final calendar.
1) Fill out Event Title and long description. You can add features to your event description that might be helpful to your viewers. If you do not need additional features other than wording; then skip to step 2.
* Add Media – this is how you can add a picture, document attachment such as a PDF, or an audio file to your calendar listing. It is preferable to use PDFs for attachments because the greater proportion of site viewers on both computers and mobile devices will be able to view them. Please do not use files like .pub (Microsoft Publisher), .doc (Microsoft’s proprietary word document), or .rtf (Mac’s proprietary word document) because not everyone will be able to open them. You will use the same ‘add media’ button for each type of thing you will upload; pictures or documents.
As far as images; please ONLY use .jpg or .png image types, and please make sure they are resized to no larger than 700px across preferably to make sure that your website will display quickly and efficiently, and not overwhelm people’s internet connections. Large images can take an especially long time to load, and if a concern is that folks are on limited internet connections or mobile connections; we want to be sure that we don’t give them too much data to deal with at once.
If you need help making a PDF from another document, do not hesitate to email your document to roz@hostgis.com and Rose can make you a PDF quickly and email it back to you for attachment.
You can use this option for SMALL audio clips (less than 8MB), but if your audio clip is larger, do not use this option (we will discuss this in the Podcasts / Downloads section of these instructions). I would advise not to put large audio clips into Calendar events anyway.
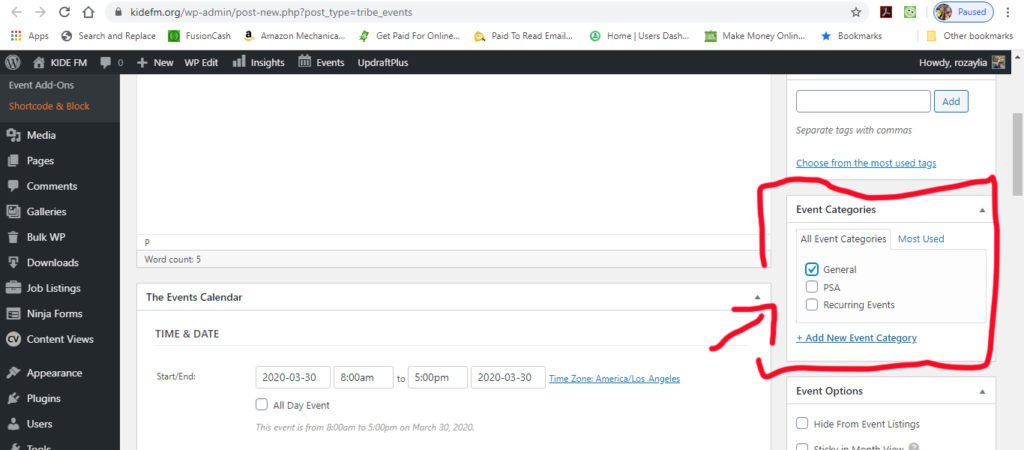
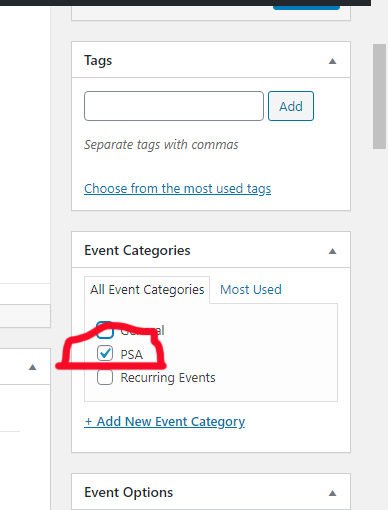
2) Event Category. This is extremely important because this is what dictates where your event is going to show up! You will select ‘General’ here for the main calendar. If this is a recurring event, you may also select ‘Recurring Event’ but please do NOT select ‘PSA’ here. This option is found on the righthand column of the page.
3) Time, Date and other Info Just scroll on down the page from the description box and it’s right below that. This is where you would schedule your event’s specific time, and add multiple instances of each event if you need to (using the option ‘Event Series – Schedule Multiple Events’).
After setting your date, you can set where the venue is. There are many preset venues that have been used already in the calendar, so be sure to check the drop down that says ‘Create or Find a Venue’ and look through the list and see if your venue already exists. You have an option here to show a map and map link if you wish.
Keep on scrolling down and if the event has a separate website, you can enter it here; you *can* enter a cost if it has it, but I would actually prefer if you didn’t because it screws up the display, honestly, so if you would, please just include event cost in your initial description if need be.
4. Excerpt Scroll down past the section that says “Javascript Styles” please just ignore that section, that’s there if I need to change the actual code on the page, which I usually will not; but it’s there just in case.
Having an excerpt is helpful sometimes if you want a brief short description to show up on the initial event listing that wraps up the whole thing in a sentence or two; but this is not necessary; it’s only if you want to put one there; so feel free to ignore this also if you would like.
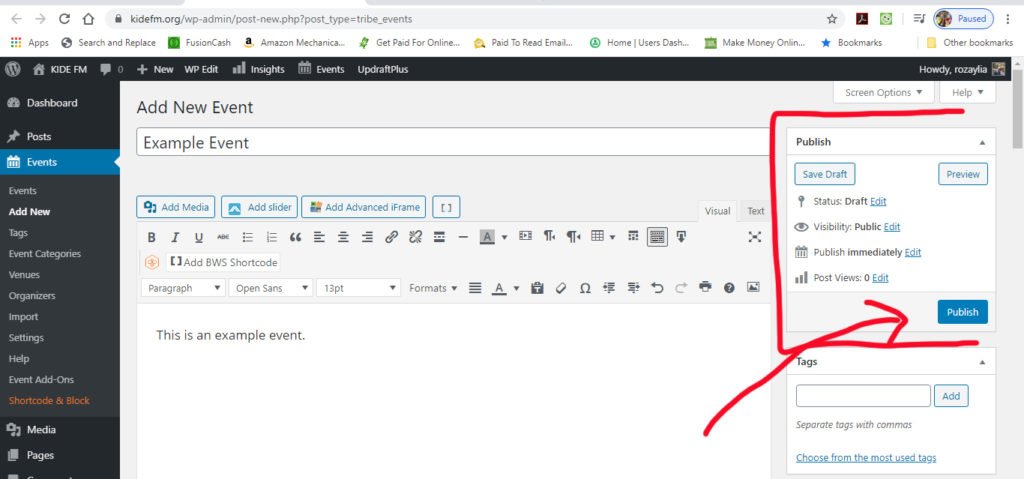
5. Publish Please ignore everything else on the page EXCEPT publishing the page. Scroll back up to the top right, and make sure that the Visibility says ‘Public’ and click the button that says “Publish.” In the future, if you need to make edits to this event, you will press the same button to save your changes, only it will say “Update” after it’s published.
Also, this is where you can look later to see how many views your event has gotten. There is a spot that says “Post Views” and it will tell you how many views have occurred.
HOW TO ADD PSA EVENTS:
The steps are the same, except that PSAs are much simpler. The description will likely not have any additional documents or pictures to add. It’s simple text.
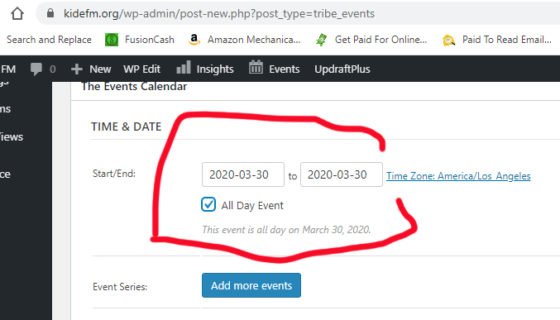
The key different, is to only check the PSA category when making a PSA event, and when choosing event day and time, do not pick specific times, select the end date you want the PSA to run, and check ‘all day event’.
HOW TO EDIT CALENDAR EVENTS:
The easiest way to do this is to navigate to the event page by going to the Calendar:
https://kidefm.org/calendar2/category/general/ for Community Events
https://kidefm.org/calendar2/category/recurring/ for Recurring
https://kidefm.org/calendar2/category/psa/list/ for PSA
Click on the event in the calendar grid or list that you want to edit. When you click on its title, the event page will open. At the top of the page in the black bar, click where it says “Edit Event”

A page will open that will be the same form that you used to create the event in the first place; edit as you need.
PODCASTS & DOWNLOADS SECTION
This is a bit more complicated, as for larger media files you will need to use the FTP client; you can use whichever you prefer; but I have Joseph using WinSCP, and so the instructions I will give here are for WinSCP.
TO ADD A MEDIA FILE TO THE DOWNLOADS SECTION:
Follow the steps here:
(password is kidestaff1)
https://kidefm.org/staff-media-portal/
CREATING A PODCAST POST WITH THE MEDIA YOU UPLOADED
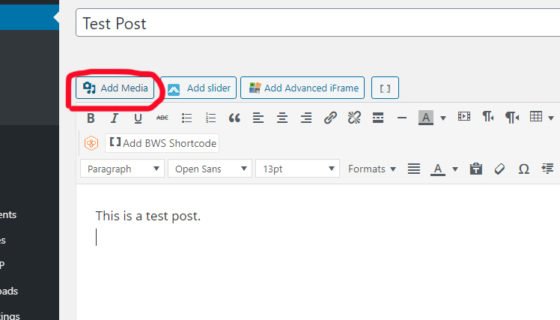
- Go to the black top bar and mouseover ‘New’ then click on ‘Post.’
2. Enter the title of the episode, and if you have a description. To put in the media file, click on ‘add media.’
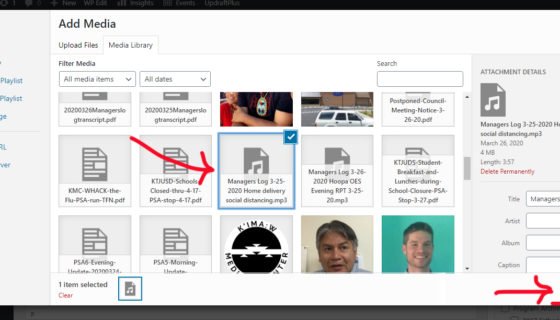
3. A popup window will open showing all the files you have available to you; this includes all pictures, documents, audio files, etc. (This is where we imported our upload to when we used the ‘Add from Server’ program). You can also directly upload images, documents and other media files here as long as they are smaller than 8MB.
To select the file, find the document in the list of thumbnails, you can also search by title in the search box. Once you find the one you want, click on it, and once all its details load, click on ‘Insert into post.’
You put a transcript copy in the same way as you do the audio media. Open up ‘add media’ click on the document you want to use, click on ‘insert into post.’
IF YOU NEED TO UPLOAD SOMETHING FROM HERE:
Click on Add Media, then click on ‘Upload files’ in the upper lefthand corner of the popup.
A. Click on the button that says ‘select files’
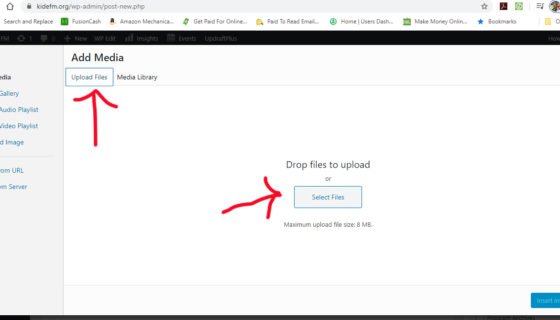
B. A popup window will open with a list of files on your computer; browse to find the one you want, and then click ‘Open.’ Once the file uploads, click ‘Insert into post.’
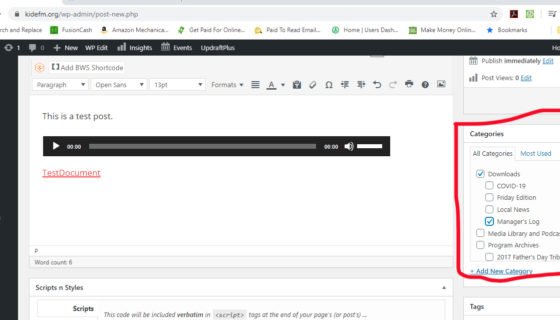
4. On the righthand side of the screen is a list of Categories and Subcategories. THIS IS VERY IMPORTANT so your post is listed in the show category it needs to be. For example, you may be uploading a Manager’s Log, so you would select ‘Downloads’ as the parent category and ‘Manager’s Log’ as the subcategory.
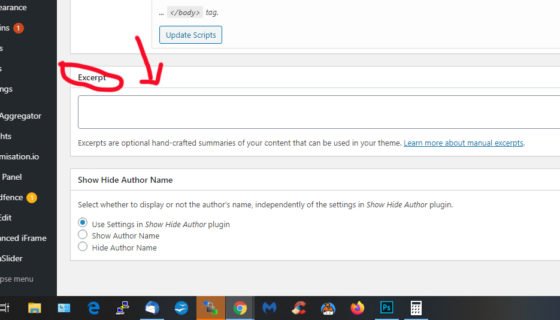
5. Scroll down to the bottom of the page and enter a short description into the space marked ‘Excerpt.’ This should be a short one or two sentence description of the episode.
6. This is not required; but it’s helpful as far as consistency for these posts. On the right hand side, you can add a featured image, which will show up in the listings pages for the podcasts and also in the post itself. Click on ‘Set featured image’ on the righthand side.
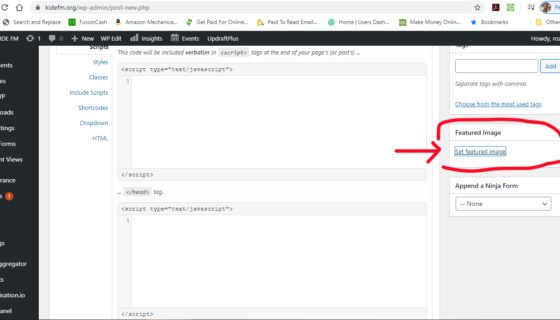
7. This will pop up the media library; go through the same process you would to add any other media to your post, and click on ‘set featured image’ when you are done. You will see an image populate under the ‘Featured image’ title on the righthand side, which means the image is ready.
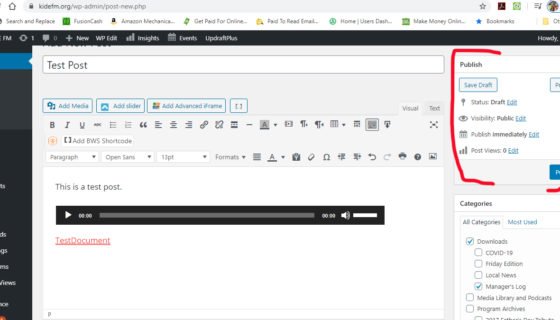
8. Then scroll back up to the top of the page, and click ‘publish’ in the upper righthand corner.
HOW TO CHANGE A CURRENT DOWNLOAD TO AN ARCHIVED EPISODE
- This is quite simple! The easiest way to do this is to go to the Podcast / Downloads section of the website here: https://kidefm.org/podcasts-downloads/
- Navigate to the episode you want to archive. Once you are on that episode’s page, go to the top bar and click ‘edit post.’

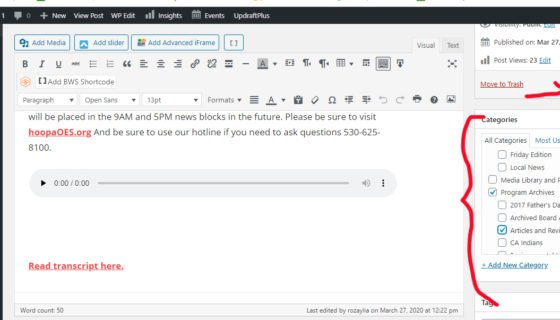
Once the editing template opens, simply go to the righthand side of the page, and change the category to one of the archive categories. Be sure to remove the original checkboxes so that the post no longer shows in the Download sections.
When you are finished changing the categories; click ‘Update.’
OTHER INSTRUCTIONS YOU MAY NEED
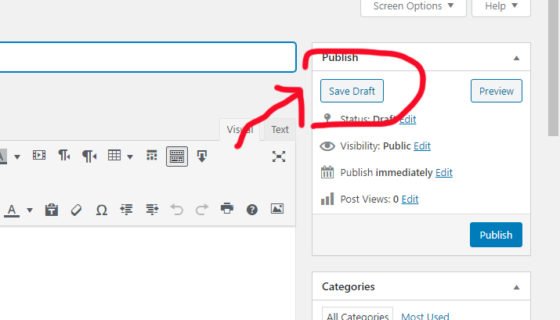
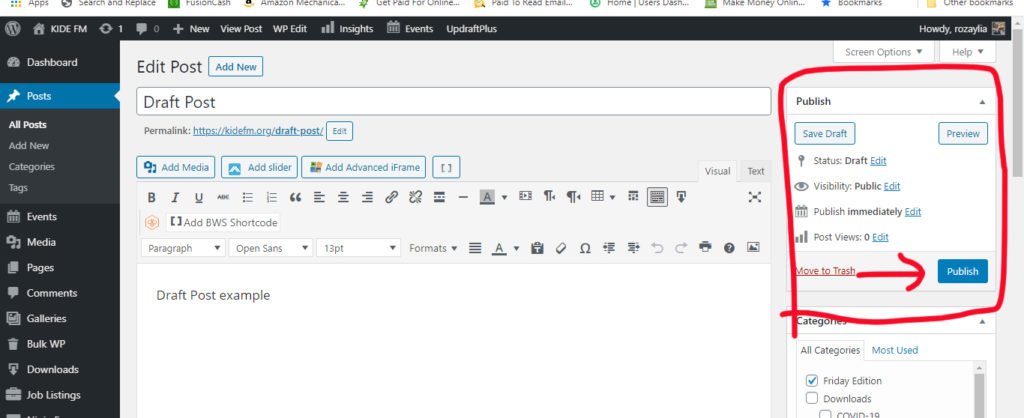
TO SAVE YOUR POST FOR LATER EDITING BEFORE PUBLISHING
If you need to save your post for later instead of publish, simply click on ‘Save as Draft’ instead of Publish.
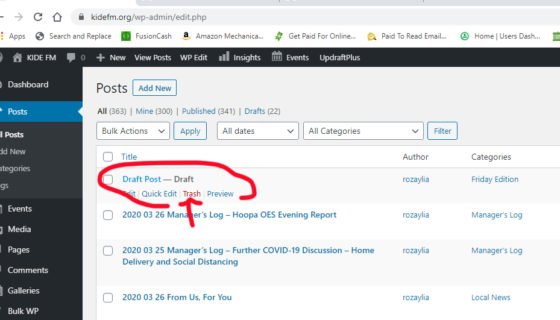
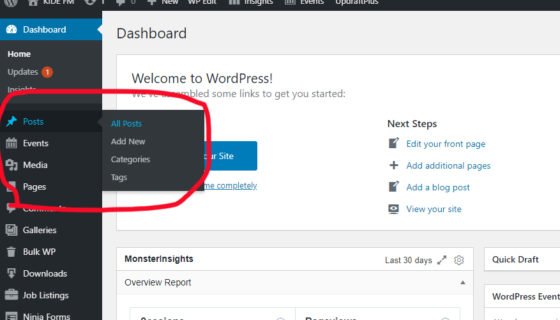
To find the draft later so you can finish, go to the lefthand menu, mouseover ‘Posts’ and then click on ‘All Posts’
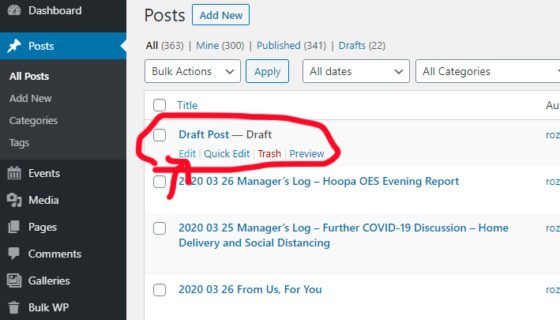
Find the draft post in the list that you want to publish, and mouseover its title. You will see a link titled, ‘Edit.’ Please click on that.
Once you open this and edit things the way you want, then click publish.
HOW TO DELETE A POST
To delete a post, go to the lefthand menu, mouseover ‘Posts’ and then click on ‘All Posts.’
Once you get to the post listing page, mouseover the post that you want to delete, and simply click on the word ‘Trash.’